Here is a guide to assist students in completing MS. Word - Assignment 1
Step 1: Adding border
On "page border" tab:
4--> Setting : Box
6--> Color : Green
7--> Width : 1 1/2pt
8--> Apply to : This section - First page only
Step 2: Insert header & footer
1--> Insert tab
2--> Click on Header
3--> Choose Blank Header
With Design tab active:-
4--> Tick on Different first page
5--> Tick on Show document text
6--> Header from top : 0.5"
Footer from bottom : 0.5"
8--> Click Page number
9--> Choose Bottom of page
10--> Choose Plain Number 1
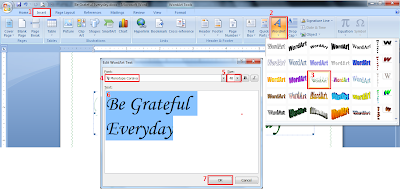
Step 3: Insert Word Art
1--> Insert tab
2--> Click on Word Art
4--> Font : Monotype Corsiva
5--> Size : 48
7--> Click OK
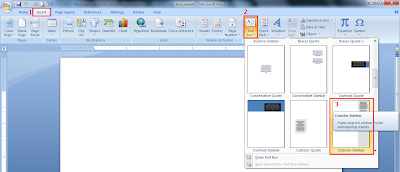
Step 4: Insert text box
1--> Insert tab
2--> Click on Text Box
3--> Choose Cubicles Sidebar
With text box active, go to Format tab and set the Shadows Effect accordingly.
It is a thousand times better to have common sense without education, than to have education without common sense. – Robert G. Ingersoll
Monday, 26 September 2011
Saturday, 24 September 2011
Create a blog - A step by step guide for beginners (2)
Now, let's try our first posting
Step 1: Type the following: (* In the text editor, you may use the 'numbered list' function on the top)
Title: 1st Assignment: Things I like to do
Things I like to do:
Step 2: Now, let's try insert an image. Click on the "insert image" button, and browse your desired image and click "Add selected"
Step 3: Click on the "preview" button to preview your blog. This will open a new tab for your preview. You can just close this page when you are done, and go back to your previous page.
Step 4: After editing and correction whatever that's necessary, you can publish your post by clicking the "publish" button.
Step 1: Type the following: (* In the text editor, you may use the 'numbered list' function on the top)
Title: 1st Assignment: Things I like to do
Things I like to do:
- Sleeping
- Reading
- Dreaming
Step 2: Now, let's try insert an image. Click on the "insert image" button, and browse your desired image and click "Add selected"
Step 3: Click on the "preview" button to preview your blog. This will open a new tab for your preview. You can just close this page when you are done, and go back to your previous page.
Step 4: After editing and correction whatever that's necessary, you can publish your post by clicking the "publish" button.
Create a blog - A step by step guide for beginners (1)
This is a very simple tutorial in creating a blog for a total beginner. In this tutorial we gonna create a blog in blogger.com
Step 1: Go to this link here and click on get started.
Step 2: Fill in your details.
If you don't have an account yet, you may opt for a new gmail account here.
Step 3: Next you have to name your blog. Your blog title will be appeared at your window's title. Don't worry, you still can change your blog title and address later.
Step 4: Choose your template and click continue.
Voila! Now you have created your blog, so let's start posting
Click here to start posting~
Friday, 23 September 2011
Subscribe to:
Posts (Atom)